3D Scanning
This blog post is to share research I’ve done while looking into 3D scanning as a requested topic for the Cardston Creative Technologists and presented on June 20, 2020.
How does 3D scanning work?
There are several types of 3D scanners. With one exception, they all use a camera to take pictures of something.
Some scanners use a laser to shoot a light at a known angle. If you know the angle the light leaves the laser, and see where it enters the scene, you can calculate where it hit a surface and infer something about the surface’s position.
A faster modification is to use a laser-level that shoots out a whole line of light. You can capture images of that and see where things deflect, and infer the shape of whatever the light is hitting.
A step up from that in speed is to use structured lighting patterns and take images of them. Imagine using a projector, and projecting one half of the image dark, and the other light (and taking a photo of it), and smaller and smaller bands of light and dark (and photographing them). Looking at the images, you can tell what is in the light and what is in the dark, in different pictures, and work out where that area was in the original projected image. Knowing that, you can see how it is distorted and bent, and work out the 3D shape that is reflecting the light.
The Microsoft Kinect (v1, released in 2010) also uses structured lighting. It has an infrared light projector that projects dots into a scene, and a camera that picks it up, and can determine the angle to the dot (and, knowing the distance between the camera and projector, can determine the distance to the dot).

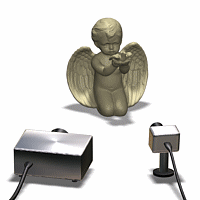
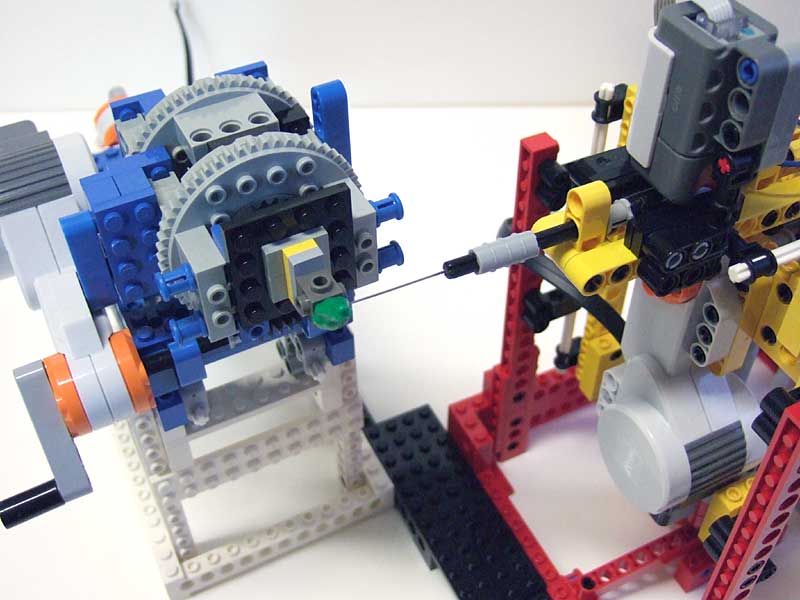
One altogether different approach (from 2008) was to use a LEGO Mindstorms robot with a distance probe to carefully measure the surface of an object. (I think this could be reproduced by abusing a 3D printer with a BL Touch bed levelling sensor).
And, pen-ultimately, we have the milk scanner:
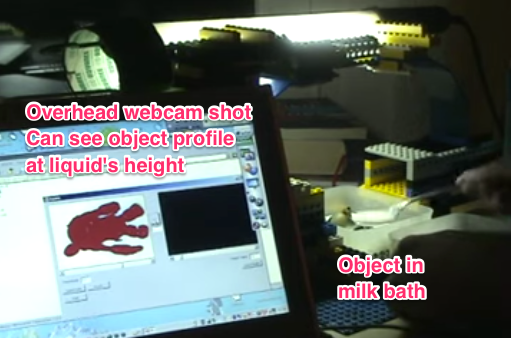
This is a clever idea from around 2007. Put a small object in a container, and take photos of it while you fill it up with milk. The milk is easy to identify in the image, and, if you know the height of the milk in the container, you know which cross-sectional slice of the object you are looking at when you take one image and compare it to the next. You can use this to reconstruct a three dimensional view of the subject.
I was stoked to 3D print a 3D scanner set up and go! The more I looked into it, though, the more the more one method dominated, and that method is Photogrammetry.
Before we change gears, here’s a video showing off a number of 3D scanners (but not showing any prices); apparently $2000 3D scanners are better than photogrammetry, but $200 ones are worse.
Also, I do have a Kinect v1 and an adapter for using it with my computer. I looked all over for software that (still) works, and, this morning, found Skanect, which is really cool.
Photogrammetry
For photogrammetry, you take a bunch of photos of an object, trying to get multiple angles and multiple positions, and then give it to a program using a “Structure from Motion” technique to deduce the 3D shape.
The steps used go something like this:
- Feature Extraction — images are analyzed for features; the sorts of features computer vision algorithms detect are mostly corners, and sometimes edges.
- Image Matching — by comparing where features are in one image to where they are in another, the program can figure out which photographs were taken close together are most strongly match each other.
- Sparse Reconstruction — assuming that the features found previously have unique coordinates in 3D space, the algorithm can compare the angles between features and solve a series of equations to tell it where the cameras must’ve been relative to each other, and where the real object must’ve been relative to the cameras. It can make a sparse mesh with vertices in the projected locations where features have been found and matches in multiple images.
- Dense Reconstruction — I’m not certain how this step works, and it is absolutely the most computationally intensive step. I suspect it works by linearly interpolating pixels from the images between the features, trying to correlate them to other images, and using that information to make additional 3D coordinates for the model.
- Meshing — here neighbouring points are joined by polygons to form a surface.
- Mesh Decimation — usually our mesh has many, many points (like hundreds of thousands). It’s too many to do anything useful with, so we need to reduce the number of polygons while retaining the shape of the mesh. This is decimation.
- Texturing — We create a texture map, or image to wrap around the mesh, by going back to the photographs and grabbing pixels that best show what different surfaces looked like.
It is quite the process!
And, sometimes, you need to take further steps, too.
Pre-steps: Some people are very particular about the quality of the photos — saying things like ‘blur out the background’ and ‘use a green screen to mask the images’ and ‘make sure the lighting remains constant’. You may also want to grab frames from a video; for the Mac, SnapMotion is a nice little (paid) utility.
Post-steps: The 3D reconstruction doesn’t know which way up is! Also, once you had a 3D object, it’ll usually have a hole in it — such as the underside you couldn’t photograph. You’ll either need to fill that in — especially if you want to 3D print it, where you need a watertight mesh — or combine it with another photogrammatically reconstruction of the same object, to form an even more accurate 3D model. Tools like MeshMixer and MeshLab may be valuable, and I think Instant Meshes sounds cool, too.
I have found that this is an area of active research, and the programs that exist appear to mostly be university research projects. I tried several open-source projects, and compiled a few. Most of them run from the command line, where you say, ‘Yo, computer, here’s a bunch of images’ and the computer says ‘Processing…’; you typically issue a command like that for every step, and hope that you get something good out at the end.
Incidentally,
- the best resource I found for actually using these programs was “Trying all the free Photogrammetry!” by Dr. Peter Falkingham.
- The best source to find Photogrammetry software is an older revision of a Wikipedia article, “Comparison of photogrammetry software.”
- Many of the programs require CUDA, an NVidia graphics card technology for doing 3D computation, especially for the Dense Reconstruction step. I really wanted to see what the highly rated Alicevision Meshroom could do, but the results were awful if you didn’t have a CUDA-capable graphics card and couldn’t do the Dense Reconstruction.
- NASA even makes a photogrammetry package, and it made it sound like if you knew the size of features in the input image, it could give you a proper scale for the output models!
- Also, super cool, there’s a site called Tanks and Temples where they used a really expensive and highly accurate 3D scanner to scan some tanks and some (Greek?) temples. They also took video. You can try to reconstruct 3D models using whatever photogrammetry techniques you like, and the results can be compared to the “ground truth” version that they scanned. Your algorithm can then go on the leader board, and we can all find out what works the best!
I should also point out that there are a number of apps for phones, and, even doing the best I know how, I was disappointed with the results obtained.
Having said all that, we’re going to try this out. We’re going to use a trial version of Agrisoft Metashape (formerly known as Photoscan), which is available for Windows, Mac, and Linux.
You’ll want to use some sample image sets (below), or take your own photos.
A good object:
- Stays still! You are looking for still life. Unless you have a subject willing to stay in a pose for a while (or have a rig with, say, 42 cameras that shoot all at once), you’re going to want something inert.
- does not have reflections, transparency, or shiny surfaces — the reflections can’t be matches together in photos of different angles, so the surface can’t be reconstructed. [In this video, the guy scanned a see-through plastic container by first spray-painting it a matte grey and then flecking white and black speckles on top.]
- Similarly, surfaces of uniform colour don’t work well. Someone having trouble scanning their interior walls was told to put sticky notes on them in different places to give the algorithm some features to find and match.
- Things that are rotationally symmetrical are also problematic. Given a view of an object, the algorithm can’t determine which side it is looking at.
A rock is probably an ideal candidate. I had good results with a plush toy. A building should work fine. I had very poor results with a piece of Lego, even after I coated it in flour and pepper. (One plus size is that, unlike other 3D scanners, Photogrammetry doesn’t care about scale. If you can get photos through a microscope or telescope from different angles, you are good to go!)
Some sample photo-sets:
- Château de Sceaux (11 photos)
- ET plushie (8 photos)
- Kermit plushie (10 photos)
- Cardston Temple (11 photos) or 100 photos extracted from this drone flyover video (with permission)
- Millenium Falcon papercraft scene (70 photos) and how-to-video
- Stormfly Plushie (123 photos)
- If you have more time, Tanks and Temples has photo-sets, too
Lastly, about making 3D images for use on Facebook: in Metashape, after you’ve done all the calculations (and maybe even earlier), you can right-click on a photograph, and choose “export depth”. With the default settings, it saves out three images, one names {filename}_diffuse.png, one named {filename}_depth.png and one named {filename}_normals.png. You only need the first two. Take the one ending in “_diffuse” and remove the “_diffuse” part of the name. Then, with a Facebook post in progress, drag and drop those two files to attach them. FB will turn it into a 3D image!
Leave a Reply